
Every list in .legal works the same way. You narrow it down with filters, choose the columns you want to see, save the result as a view you can come back to, and export exactly that to Excel. This article covers all lists, for example contracts, assets, legal entities, processing activities and transfers, processes, tasks, incidents, audits and the controls in a framework.

The parts of a list
- Search finds records by name.
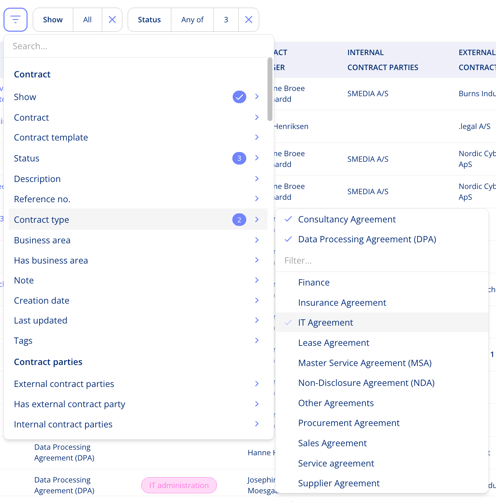
- The filter icon next to the search box adds a filter.
- Active filters are shown as boxes above the list, with the number of selected values, for example Processor: 1 of 22. Click a box to change its values.
- The column icon opens the column picker in a panel on the right.
- The Excel icon exports the list.
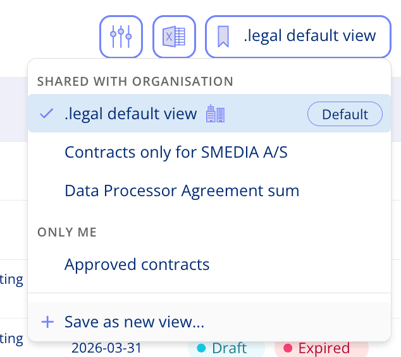
- The view menu on the far right shows the name of the view you are on, for example .legal standard view, and lets you switch between views.
How to add a filter
- Click the filter icon next to the search box.
- Choose the field you want to filter on, for example Type or Business area.
- Click outside the menu if you want to add an empty filter or search for the value and tick the ones you want. You can tick several.
- Click outside the menu. The filter now appears as a box above the list.
To add more values later, click the box and tick them. You only need the filter icon for the first value. Text fields can be filtered with contains and does not contain, and lists of values with any of and none of. See Advanced Filtering.
How to choose columns
- Click the column icon. The column picker opens on the right, with the columns grouped by where they belong.
- Tick the columns you want and drag them into the order you want.
- Click a column heading in the list to sort by it.
If your columns differ from the view you started from, a yellow marker shows it. You can reset to the view's columns at any time.
How to save a view
Start from an existing view, adjust the filters and columns, and save the result.
- When you change a filter or a column, a yellow dot appears on the view menu. It means the list no longer matches the saved view.
- Open the view menu and choose Save as new view, or save the changes to the view you are on.
- Give the view a name, and choose whether it is personal or global.
- A personal view is only visible to you.
- A global view is shared with everyone in your organisation, under Shared with organisation in the view menu. What a user can see still depends on their role.
- Saving changes overwrites the view. If you want to keep the original, save a new view instead.
- There is no limit to the number of views, filters or columns.
Standard views from .legal
Some lists come with standard views to get you started. On processing activities, for example, you can choose between Data processors in processing activities, Legal basis in processing activities and Overview of storage and deletion periods, and the Transfers tab has standard views too. They replace the old custom lists, and any custom lists you had have been moved over to saved views.
An administrator can set one global view as the default for the whole organisation. It applies to everyone who has not chosen a default view of their own.
Set your own default view
Want a particular view to open first? Go to the view menu, click the overflow menu next to the view you want and select Set as default view. From now on, that view opens whenever you visit the page.
Export to Excel
Click the Excel icon to export the list. The export contains what you see: the records that match your filters, with the columns you have chosen.
Tip: choose the list that matches what you want to count. On processing activities, the Activities tab gives one row per activity, while the Transfers tab gives one row per transfer, so an activity with several transfers appears several times. To list every activity where a particular organisation is your processor, stay on the Activities tab and filter on that processor. Use the Transfers tab when you need each transfer on its own row.
Important Notes
- Filtering, searching and choosing columns work on every plan.
- Saving your own views and exporting a list to Excel require the Custom Lists add-on.
- Your Article 30 record can always be exported, with or without the add-on.
- Filters are kept within your session, so they are still there if you navigate away and come back, until you close the browser.